Kan brukes til ansiktsgjenkjenning.
Kan også kobles opp mot Home Assistant og styres med Aleksa
ESP32-CAM


Produktkode:
388aa
Tilgjengelighet:
Opp til 1 mnd leveringstid
Lager :
N 15
Pris:
kr. 150,00
|
Description: |
https://robotzero.one/esp-who-recognition-with-names/
The ESP32-CAM has the option to use either the built-in PCB antenna or an external antenna as the one shown in the following figure.

Next to the IPEX connector there are three little white squares laid out like a “<” with the middle position being common. There is a resistor selecting the desired antenna. Here’s the two configurations:
- To use the IPEX connector with an external antenna, the resistor must be on the bottom position, like this “\”. See illustration below;
- To use the PCB antenna (on-board antenna), the resistor must be on the top position, like this “/”.
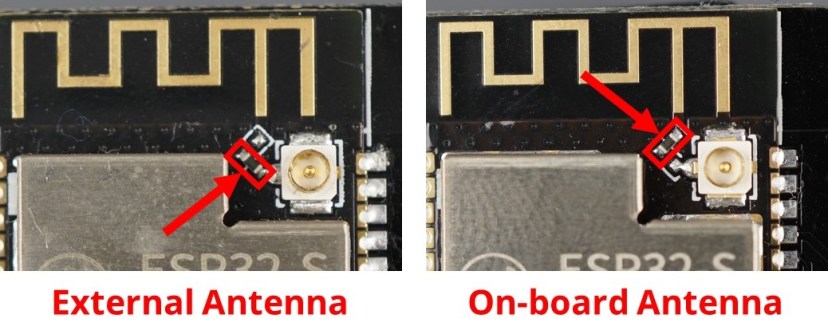
Take a look at your board to see if it is set to use the on-board antenna or the IPEX connector. Using the on-board antenna works well if you are close to your router. We recommend using the IPEX connector with an external antenna for better results.
Projects with video streaming crash frequently when you don’t use an external antenna due to poor connectivity. So, make sure you get one to have your projects working reliably.
To enable or disable the on-board antenna, you just need to unsolder that resistor and solder it in the desired configuration. You can also drop some solder to connect those points (you don’t necessarily need to add the resistor as long as the pads are connected).
Note: You can’t use the two antennas at the same time, so you can only have one connection for the antenna.
Kilde: https://makeradvisor.com/tools/esp32-cam-external-antenna/
Testing the ESP32-CAM Wi-Fi Signal Strength
You can upload the following code to your ESP32-CAM boards to check the signal strength of the connection to the router (RSSI – Received Signal Strength Indication).
#include "WiFi.h"

const char* ssid     = "REPLACE_WITH_YOUR_SSID";
const char* password = "REPLACE_WITH_YOUR_PASSWORD";

void setup(){
  Serial.begin(115200);
  WiFi.begin(ssid, password);
  while (WiFi.status() != WL_CONNECTED) {
    delay(500);
    Serial.print(".");
  }
  Serial.println("");
  Serial.println("WiFi connected.");
  delay(100);
}

void loop(){
  Serial.print("RSSI: ");
  Serial.println(WiFi.RSSI());
  delay(2000);
}
When testing the signal strength, the closer the value to 0, the stronger the signal is.
In our case, with a distance of approximately 5 meters (16.4 feet) to the router with obstacles in between (walls), we got the following results:
- ESP32-CAM without antenna: RSSI of approximately -60
- ESP32-CAM with antenna: RSSI of approximately -36

https://randomnerdtutorials.com/esp32-cam-video-streaming-face-recognition-arduino-ide/

face recognition:
https://robotzero.one/esp-who-recognition-with-names/
https://robotzero.one/esp-who-recognition-with-names/

ESP32/ESP32S module 2 ext antenna conn
Pris: kr. 130,00
MINI32 Wemos ESP-WROOM-32
Pris: kr. 140,00
OV2640 Camera Module 2.0MP
Pris: kr. 80,00
DOIT ESP32 DevKit v1.0
Pris: kr. 92,00
WEMOS Lolin32
Pris: kr. 130,00